React 19: useTransition, useDeferredValue and useActionState
The React documentation is an amazing resource for learning Hooks, but let’s be honest — it’s not exactly linear. It’s designed as a reference, which can leave you wondering: Where do I even start? What’s the right order to go through this?
This post is my attempt to create a simpler, more beginner-friendly guide to React Hooks. Think of it as a curated walkthrough, inspired by the React docs, but designed to flow more like a story.
Also, heads up: I’m skipping over features like Suspense and server components. Why? Because they’re mostly relevant if you’re using frameworks like Next.js — and let’s face it, not everyone is. This article sticks to the basics, focusing entirely on the client-side.
useTransition
If you’ve browsed the React docs, you might’ve noticed the useTransition page is long. That’s usually a good sign—it means there’s a lot to unpack. So, let’s start here.
At its core, useTransition lets you tell React: “Hey, this part of the UI is going to take a while to render. Can we do it in the background?”
Here’s how it looks in code:
const [isPending, startTransition] = useTransition()The useTransition hook gives you two things:
- A
startTransitionfunction, which you use to wrap state updates that can be deferred. - An
isPendingboolean, which tells you if React is still rendering the deferred updates.
When you use startTransition, you’re marking certain updates as “less urgent.” React will schedule those updates in the background and even pause them if something more urgent comes up.
The following CodeSandbox demo show the difference between with and without useTransition hook.
CodeSandbox
CodeSandbox is an online editor tailored for web applications.
const [text, setText] = useState("");
const [isPending, startTransition] = useTransition();

const handleChange = (e: React.ChangeEvent<HTMLInputElement>) => {
  // 1. Update state immediately
  // setText(e.target.value);
  // -----------

  // 2. Or use startTransition
  startTransition(() => {
    setText(e.target.value);
  });
  // ------------
};
Imagine a text input paired with a slow-to-render list. When the user types, the list updates with the new value. Without startTransition, typing feels laggy because React blocks on rendering the list. But with startTransition, React prioritizes the input updates, making typing feel smooth—even if the list content lags behind slightly.
During this time, the isPending flag lets you show a loading spinner or some other visual cue to indicate that the list is still catching up.
But What About Debouncing?
Good question. Debouncing delays updates to avoid overloading React, but it has a downside: once the update starts, React renders it synchronously. If the UI gets heavy, it can still block.
In contrast, useTransition gives React the flexibility to pause and resume rendering based on what’s most important—like user typing. Plus, the “lag” adjusts dynamically to the user’s hardware. A faster machine? Shorter lag. With debouncing, you’re stuck with a fixed delay no matter what.
useDeferredValue
Have you noticed that in the demo I’ve been using an uncontrolled input? That’s not an accident. The reason is simple: if I used the same state for both the input value and the list, we’d run into the same problem we started with — typing in the input would feel sluggish because React would try to update both the input and the list at the same time.
So how do we fix this?
There are two approaches.
Option 1: Use Two States
The first solution is to create two separate states: one for the input (immediate updates) and one for the list (deferred updates). Here’s how that looks:
export default function UseTransitionDemo() {
  const [text, setText] = useState("");
  const [immediateText, setImmediateText] = useState("");
  const [isPending, startTransition] = useTransition();

  const handleChange = (e: React.ChangeEvent<HTMLInputElement>) => {
    setImmediateText(e.target.value);

    startTransition(() => {
      setText(e.target.value);
    });
  };

  return (
      <div className="container p-4">
        <div className="mb-4">
          <input
            type="text"
            value={immediateText}
            onChange={handleChange}
            className="border p-2 rounded w-full max-w-md"
            placeholder="Type to update list..."
          />
        </div>

        {isPending && (
          <div className="text-blue-500 mb-4">Loading updates...</div>
        )}

        <div className={isPending ? "opacity-50" : ""}>
          <SlowList text={text} />
        </div>
      </div>
    );
}
This works fine, but having to manage an extra state can get tedious.
Option 2: Use useDeferredValue
Here’s where useDeferredValue shines. Instead of maintaining two separate states and manually managing updates, we can let React handle the deferral for us.
const deferredValue = useDeferredValue(value);With this, we don’t need the extra state. React takes care of creating a “lagging” version of the state for the deferred updates. Let’s rewrite the demo using useDeferredValue:
export default function UseTransitionDemo() {
  const [immediateText, setImmediateText] = useState("");
  const text = useDeferredValue(immediateText);
  const [isPending, startTransition] = useTransition();

  const handleChange = (e: React.ChangeEvent<HTMLInputElement>) => {
    setImmediateText(e.target.value);
  };

  return (
      <div className="container p-4">
        <div className="mb-4">
          <input
            type="text"
            value={immediateText}
            onChange={handleChange}
            className="border p-2 rounded w-full max-w-md"
            placeholder="Type to update list..."
          />
        </div>

        {isPending && (
          <div className="text-blue-500 mb-4">Loading updates...</div>
        )}

        <div className={isPending ? "opacity-50" : ""}>
          <SlowList text={text} />
        </div>
      </div>
    );
}
This approach is simpler: no extra state, no manual synchronization, and fewer things to manage.
Under the Hood
So, how does React manage the deferred value? Let’s break it down.
Imagine the user types "a" and then "ab":
- First, React re-renders with the new
immediateText("ab") but keeps thetextlagging behind ("a"). - Later, React re-renders again when
textcatches up to"ab".
This means React will often re-render the SlowList twice with the same input. For example, when the user continues to type "abc” , React will render again one more time SlowList with prop text “ab” .
Optimizing Further
To avoid unnecessary work, you can wrap SlowList in React.memo. This ensures React only re-renders the component when its text prop changes:
const SlowList = React.memo(function SlowList({ text }) {
  // Slow rendering logic
  return <div>{/* render items based on text */}</div>;
});
Now, even if React triggers multiple renders, it won’t recompute SlowList unnecessarily if the text prop hasn’t changed.
Calling API with useTransition
Let’s revisit useTransition for a moment. Starting with React 19, there’s an interesting new use case: handling async transitions—including API calls.
Here’s the key change: useTransition now supports async callbacks. That means you can perform an API call directly within the startTransition function, and React will handle the rest.
Here’s what it looks like:
import {useState, useTransition} from 'react';
import {updateQuantity} from './api';

function CheckoutForm() {
  const [isPending, startTransition] = useTransition();
  const [quantity, setQuantity] = useState(1);

  function onSubmit(newQuantity) {
    startTransition(async function () {
      const savedQuantity = await updateQuantity(newQuantity);
      setQuantity(savedQuantity);
    });
  }
  // ...
}
Notice how clean this is. By wrapping the API call in startTransition, you automatically get a built-in isPending state.
The Old Way: Managing isPending Manually
Before React 19, you had to handle this kind of state manually. It might have looked something like this:
import {useState, useTransition} from 'react';
import {updateQuantity} from './api';

function CheckoutForm() {
  const [isPending, setIsPending] = useState();
  const [quantity, setQuantity] = useState(1);

  function onSubmit(newQuantity) {
    setIsPending(true);
    const savedQuantity = await updateQuantity(newQuantity);
    setIsPending(false);
    setQuantity(savedQuantity);
  }
  // ...
}
While this works, it’s more verbose. You have to track isPending yourself, and it’s easy to make mistakes, like forgetting to reset it.
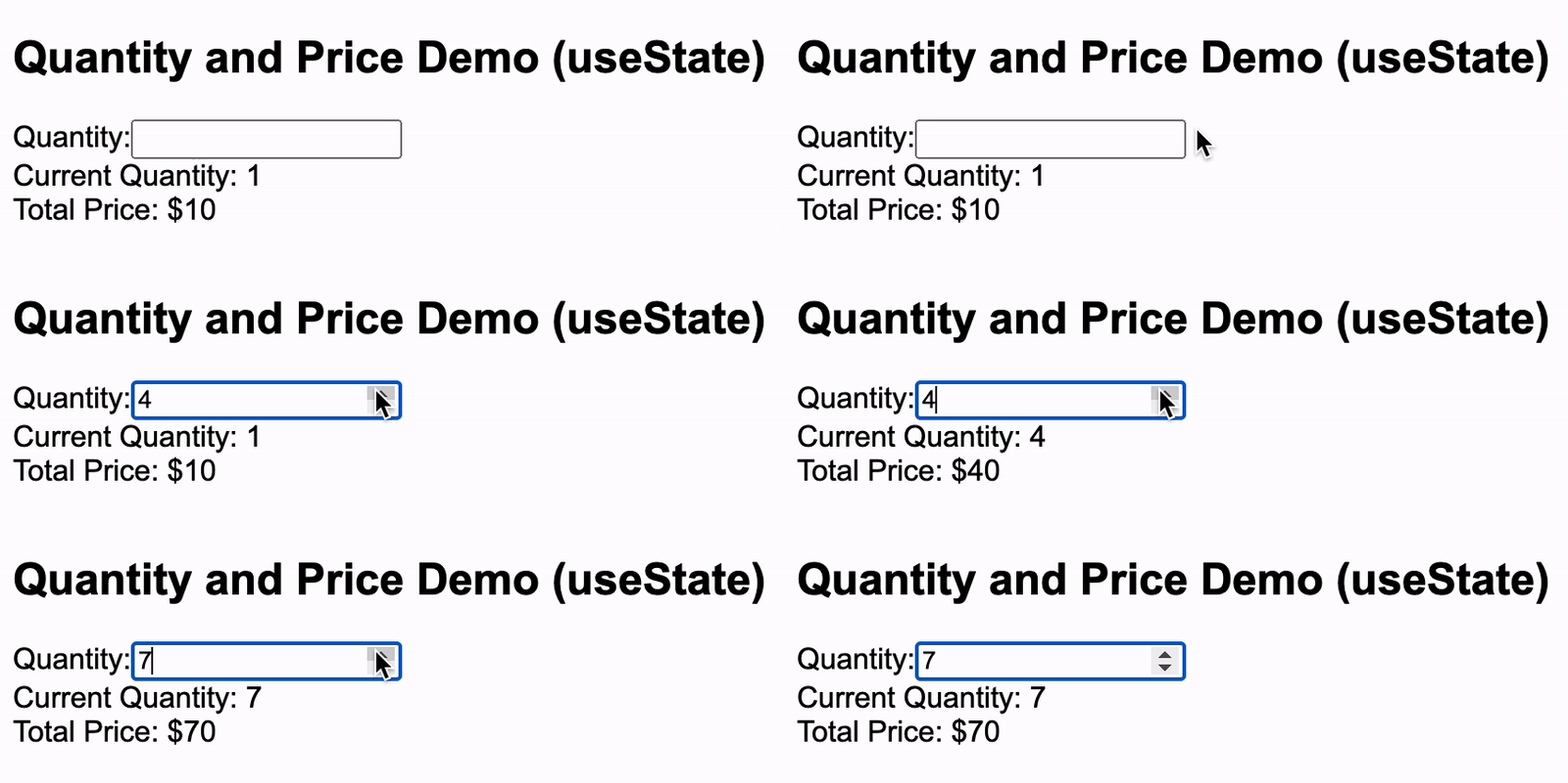
And there’s also a difference in behavior between the two solutions. Check this CodeSandbox demo below. Notice how the UI change when clicking quickly increase button multiple times in a row. The loading indicator shows, and then the quantity consequently update several times.
CodeSandbox
CodeSandbox is an online editor tailored for web applications.
Now, compare that to the solution using useTransition
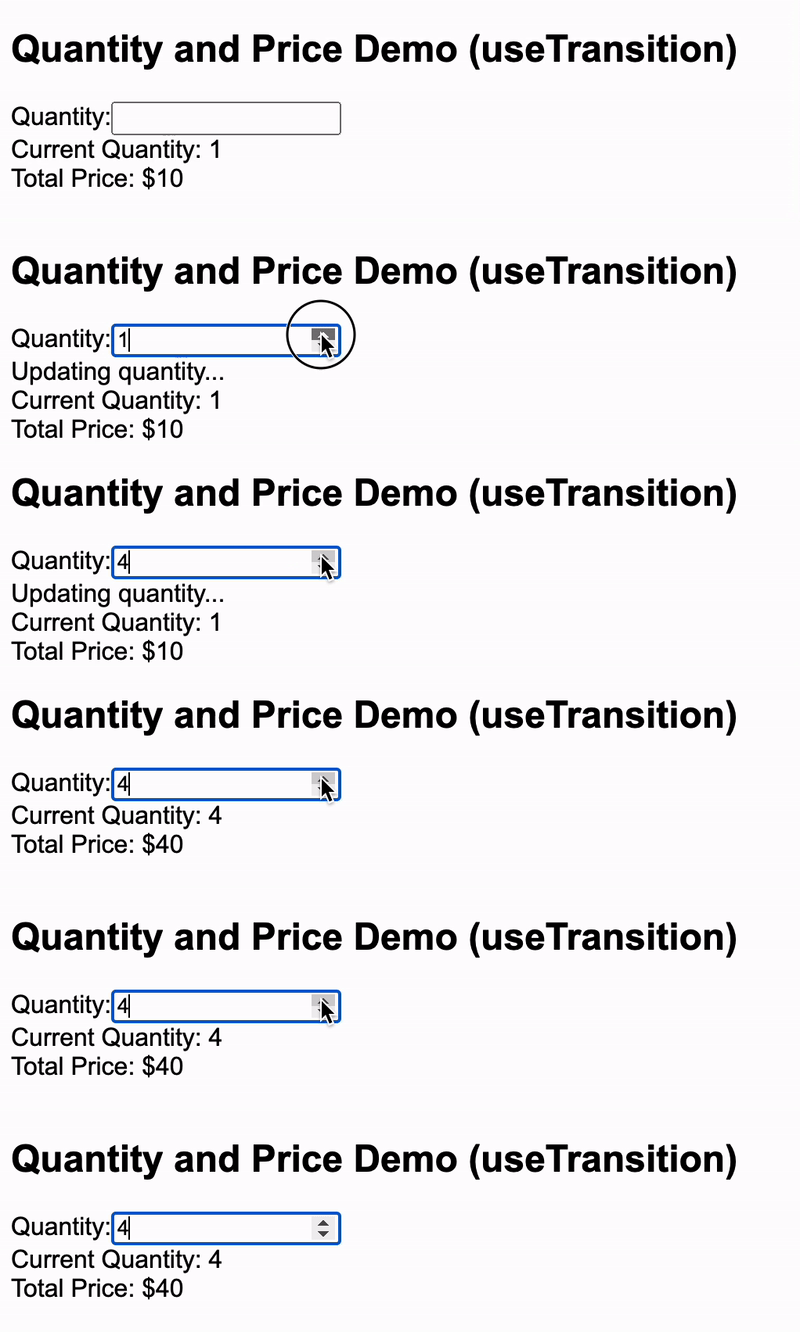
Notice how this time, the loading indicator disappear at the same time as the quantity updated to the latest value, even though the quantity’s still updated several times.
A Subtle Gotcha: State Updates After await
Here’s a tricky detail: if you call setState after an await in an async transition, React doesn’t treat that update as part of the transition. Reference: https://react.dev/reference/react/useTransition#react-doesnt-treat-my-state-update-after-await-as-a-transition
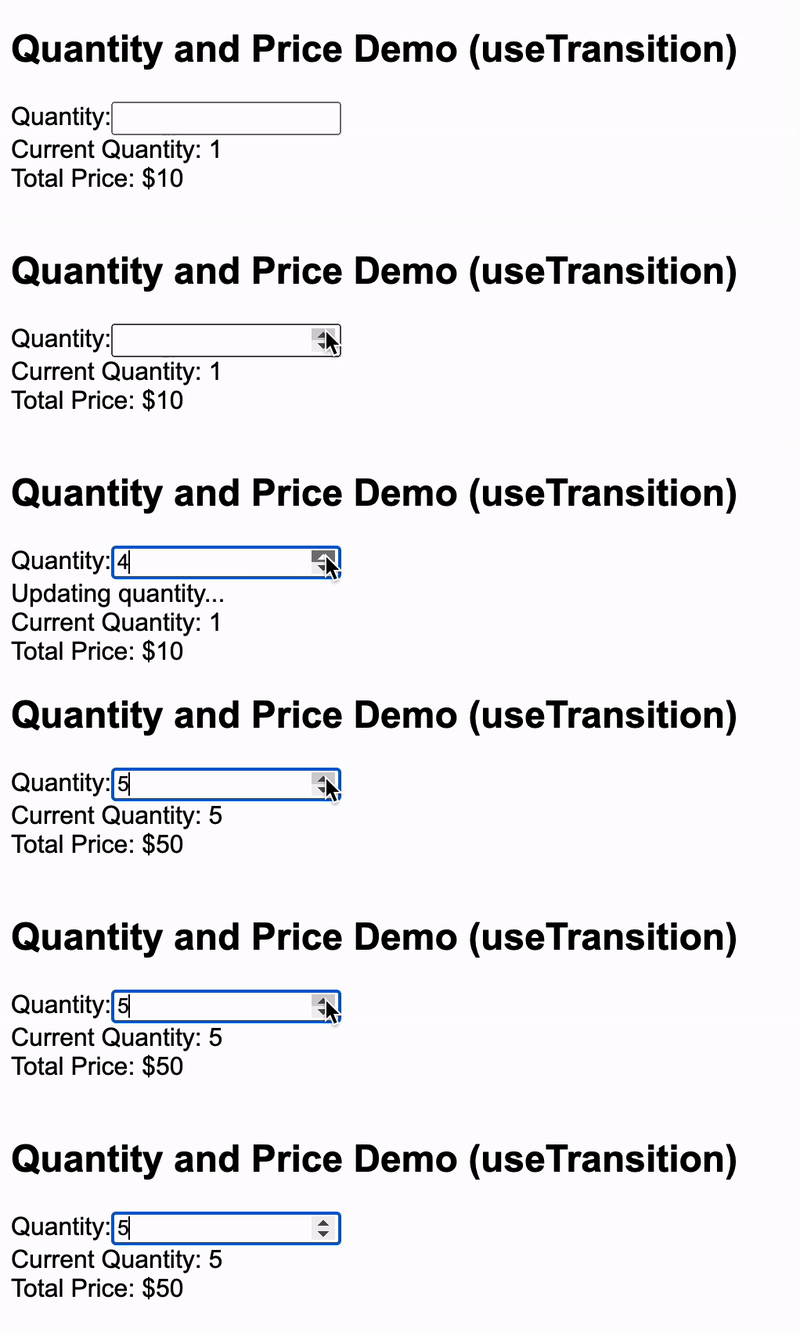
Because our setQuantity isn’t inside a transition, React doesn’t wait for all of the updates to finish before render it to the screen. The solution mentioned in React doc is to wrap setQuantity in another startTransition .
startTransition(async () => {
  const newQuantity = parseInt(e.target.value) || 1;
  const updatedQuantity = await updateQuantityAPI(newQuantity);

  startTransition(() => {
    setQuantity(updatedQuantity);
  });
});
This ensures that both the loading indicator and the quantity update appear together, right when the final value is ready:
useActionState
Let’s talk about another tool React gives us: useActionState. If you’re working with forms and need to handle mutations—like updating data or calling an API—it’s a game changer.
Here’s what it looks like in action:
import { useActionState } from "react";

async function increment(previousState, formData) {
  return previousState + 1;
}

function StatefulForm({}) {
  const [state, formAction, isPending] = useActionState(increment, 0);
  return (
    <form>
      {state}
      <button formAction={formAction}>Increment</button>
    </form>
  )
}
How useActionState Works
According to the React docs, useActionState returns an array with three values:
state: The current state. On the first render, this matches theinitialStateyou pass to the hook. After the action is invoked, it updates to the value returned by your action function.formAction: A special function generated by React. You use this as theformActionprop on a button (or as theactionprop on a form).isPending: A boolean flag that tells you whether there’s an ongoing transition
Key Details
Notice that formAction is not the same as the function you pass to useActionState. For example, in our code above, the increment function isn’t called directly. Instead, React generates a wrapper function (formAction) that you pass to the button’s formAction prop.
This abstraction makes useActionState a bit higher-level than useTransition. It’s specifically designed for working with forms and provides:
- A built-in state management system, so you don’t have to declare or manage your own state.
- An official way to call APIs from form elements, with all the wiring handled for you.
When to Use useActionState vs. useTransition
The two hooks solve different problems:
- Use
useTransitionwhen you need to call APIs or perform async tasks without forms. It’s great for things like button clicks or side effects outside form submissions. - Use
useActionStatewhen you’re working with forms and want a more declarative way to manage state and actions.
For example, let’s compare the same feature implemented with each hook:
With useTransition:
function StatefulForm() {
  const [state, setState] = useState(0);
  const [isPending, startTransition] = useTransition();

  const handleSubmit = () => {
    startTransition(async () => {
      const newValue = await increment(state);
      setState(newValue);
    });
  };

  return (
    <form>
      <div>{state}</div>
      <button type="button" onClick={handleSubmit}>
        Increment
      </button>
    </form>
  );
}
With useActionState:
function StatefulForm() {
  const [state, formAction, isPending] = useActionState(increment, 0);

  return (
    <form>
      <div>{state}</div>
      <button formAction={formAction}>Increment</button>
    </form>
  );
}